Showing posts with label Project. Show all posts

Saturday, March 10, 2012

First Project of 2012: Complete!

As I mentioned in a previous blog entry, my grandmother widened my beloved yabane-komon for me. Last weekend she finished it and it turned out awesome (thank you so much grandma <3).

It's wingspan grew as well as the overall width. It's probably still far from having the perfect wingspan, but it became much easier to wear.


Here are some pictures for comparison. I admit it's not that visible, because of my posing in the "before" picture. The sleeves don't look as short as they were:
Before


Saturday, June 4, 2011

Dyeing Result


This is how they turned out dried and carefully ironed. The bright red cloth just shows the original colour.

Dyeing Process

Deep Blue Dye

I finally got my hands on some dyeing colours and it was quite boring this evening.
So I grabbed some scrap fabric, a yellowed and a stained han-eri and a yellowed obijime to dye it deep blue ("Marineblau" to be exact).


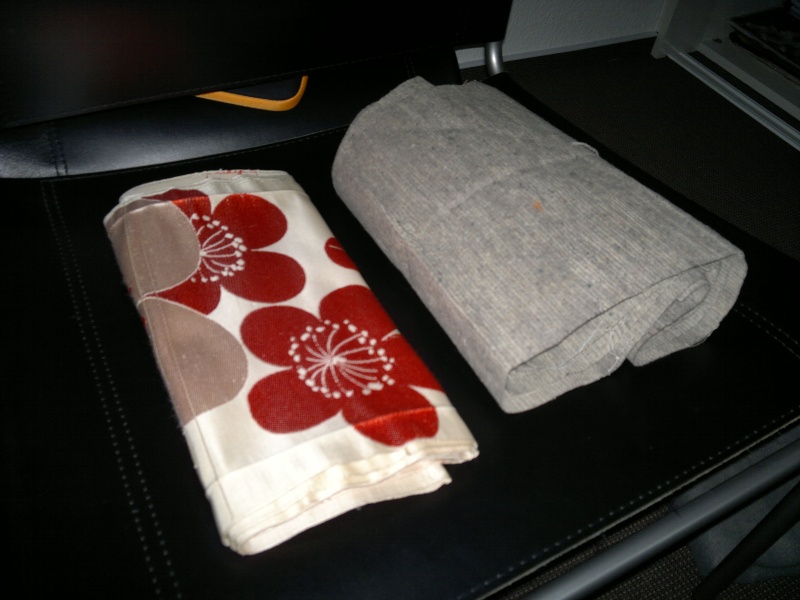
The results varied quite a lot and each piece worked different from the next. See what I got of my first round:
The first one (was:yellowed han-eri) is just as is should be, a beautiful deep and solid blue (it's a bit lighter in reality). It tool some time until it got that dark, but it holds the colour and has no freckles at all. The Obijime on the left, didn't take the colour that well, but it still became nice and dark in the end.
Now the second one (was: stained han-eri) represents everything you don't want to happen... believe me it's no a light reflection, this one went seriously wrong, it -is- that freckled...
I have no clue why, but it didn't take the colour in some placed, in others it did. Maybe it wasn't pure silk, or there was still some stuff within the fibres, I'll wash the pieces more thoroughly beforehand next time.
The light blue one is the scrap fabric and was only dipped in for a few seconds. I just wanted to test out if a lighter colour can be done with such a dark colour and it seems to be a success. Yay!

After finishing the first pieces I got adventurous. Why not try out some red fabric, when there is enough lying around?I chose two different ones. The burning-test suggested that both are silk, though the right one is very soft and shiny, while the other has a rather rough touch.
A big mistake I made: I should have make the fabrics wet before dyeing, but I forgot. This would have shown that the rougher fabric wouldn't hold the red at all, but bleed it out like hell.
The soft piece worked out very well in contrast. I divided it onto two pieces (they were just sewn together) and dyed them for different time periods.
Fun fact: If you look closely at the bottom of the fabrics, you can see blue threads (they were sewn together with them). This is the colour they would show if they were originally white.

Oh, and here you can see the colour of the dye-bath after the other the other red cloth bled out in it...
Happy dyeing! XD

Friday, May 6, 2011

Cleaning Task: Han-Eri

With a Nagajuban I've now re-sewn into a hanjuban (this one) came a lovely silk Han-Eri. It has leaves weaved in the fabric, but it's stained and yellowed in some spots, so it won't be wearable like this (T.T)

Big Problem: Silk cannot be cleaned to easily, and yellowing is almost impossible to remove. And if you managed to remove it, then you probably "removed" the whole fabric.

I still tried to make the stains at least a little lighter, so I gave it a nice lukewarm bath in our sink. A small amount of wool and silk soap and some very careful scrubbing helped with the job.
Another try was soaking it into milk and let it sit until the milk became bad. (I read somewhere this makes silk white again) But the stupid milk they sell since recently won't get bad the classical way anymore. It's the "stays fresh forever" type -.-, which won't get bad for weeks and if it does it won't clump (this is great, 'cause you'll notice when it's too late and you had a taste of it XP). Such it didn't work out well at all and took almost a week.
If you want to try that milk trick, make sure you get real "fresh" milk.

As you can see the result is not overwhelming, the stain got lighter, the yellow spots, too.
My plan is to dye it, probably in orange, red or brown so the stain will vanish within the colour.
I did this to another plain Han-Eri too. It wasn't that badly stained, but like the leave one it is to be dyed.

Wednesday, April 20, 2011

Obi - Taken apart

As mentioned in my last sewing stuff blog entry, I've got another project going on, which has higher priority for now.
It's an Nagoya-obi I purchased for some dollars and is too short for me to wear. So this obi is my victim for a "sew a pre-tied obi" experiment. The first step is already done: I took it apart and removed the lining fabric. I have a subtle feeling there's more lining fabric than anything else XD

Next, I will get it cleaned, 'cause there are some stains in several place. Wish me luck it won't get ruined.

Tuesday, April 19, 2011

Mannequin Minarai

Having fun, dressing up my mannequin I tried out possible combinations for my dance hiki. I want to convert it into a minarai-like hikizuri, but there are some other projects going first.
Practical cause of doing minarai and not maiko kitsuke: I just don't have long enough obi and most fukuro will do in terms of lengths for minarai darari.
It's not a complete kitsuke at all and there's a lot of stuff missing including eri, obijime and so on, but I had fun with it (^.^)


So first of all I went with my sha hakata-obi in light pink.
The pink colour of the obi does match with the kimono's lining, though for an authentic minarai outfit, it's way to plain. I feel there's a lot of bling-bling (aka gold/silver/colourful embroidery) on the obi missing.
I am very pleased on the other hand with the result of the obi-musubi. It's so hard doing it with this mannequin, 'cause it's very light weighted an easily falls over.

Back to the outer appearance of the ensemble. Contrast is another point, missing in my opinion. The light colours do match, but that's not the point in this case.

For a better visualisation, I added a photo with a black fukuro obi, that has some gold and colourful embroidery. For sure, this is not the best match (wrong seasonality, too harsh etc.), but it stands out pretty well against the kimono (and has bling-bling (^-^)).

This is where my new ro fukuro obi is to be introduced. The poor thing got cut by the customs right into it's pattern, it made me heartbroken, when I found out (T-T). But thus this beautiful fukuro is probably going to have a shining future as fake darari. It has some nice shiny embroidered butterflies in gold and silver and since it's made of silk I'm pretty positive I can darken the light green colour of it with silk paint. I'm just not sure, which colour would match better (more blueish or greenish?) and when I'll have time and money to realise this new and work-heavy project.


Anyway, it's always fun to play with hikis and I really enjoy doing so. Wishing everybody a nice week,
SilberRegen!

(P.S. Please don't mind the mess in the background, I was moving when these photos were shot XP)

Items: Kimono, Obi (1), (2), (3)

Sunday, October 17, 2010

Obi-dome Design: Kingfisher

It was kinda boring this weekend, so I tried myself in design. Maybe this would be a cute obi-dome or a brooch, let's see if I have time to make something out of it.

Saturday, October 16, 2010

Sewing Kimono: 2nd Attempt

This summer I sewed a synthetic ro komon. Well, my grandmother did the sewing job and I told her how to do it (^.^). She's still showing me how to do it myself, but it's so difficult.

Here's the finished kimono. The collar needs to be corrected though, I misjudged how wide it has to be. Now it a bit too wide for a simple collar, not meant to be folded in half... Not visable, when folded in a bit like here.